Hi All,
Today I will start sharing my learning out of my SAP installation in my laptop. I was a full time consultant when I first managed to install SAP in my netbook. Within a limited time I have outside of my busy time working, mainly on weekends, I managed to actually to put my hands on ABAP programming. I use my old company learning materials, to understand a bit of its concept and do the practice by my own. Since I have a quite strong programming background (I’ve made my first computer virus using assembly language and my first 3D game using C++ programming language and Microsoft Direct 3D when I was on my first year in college), plus my almost 10 years (at that time) working experience as Basis consultant who had to deal with ABAP programmers and their error or bugs 🙂 , I grasp quite a number of ABAP concept from basic to advance in relatively short period of time.
In general below are the topics I have my notes on:
*Find User Exit
*Implement User Exit
*Find BAdI Definition
*BAdI Implementation
*Dialog programming
*Dialog programming notes:
*Screen procesing
*Tabstrip control
*Table control
*Radio Button
*Selection Screen
*Selection Screen Processing
*List
**Create List
***Basic List
***Detail Lists
**List Pages
**List System Fields
**Editing/modifying List in the buffer (already created list / currently displayed list)
**List Display Preparation
**Displaying List (Starting List Sequence)
**List Events / List Processing
*Logical Database Processing
*Data Processing/Formatting (of logical database)
*Create BAPI
*Table Maintenance Generator
*Edit table entries manually
*Logical Database
*SAP Query
*ALV
*DATASET
*Enhancement
*Modification Assistant
*List Context Menu
*ABAP objects
*ABAP EVENTS / INTERFACES:
*Import/Export
*Context
*Extract
*REF TO
*SET/GET BIT
*Dialog Modules
*ABAP WebDynpro
*ITSmobile
And below are my notes on ABAP programming concepts. I hope it will give you more knowledge on the above SAP ABAP topics.
SAP ABAP Important Notes
*Find User Exit for XK01 (Vendor Master)
SE93 –> find program name from Transaction Code (XK01)
SE38 –> find CALL CUSTOMER-FUNCTION in source code (found exit function module: EXIT_SAPMF02K_001)
SMOD –> extended find SAP Enhancement by using function module exit:EXIT_SAPMF02K_001 as exit function. SAP Enhancement found: SAPMF02K
*Implement User Exit
CMOD –> create customer modification project & assign SAP Enhancement (SAPMF02K) & activate
SE37 –> Edit the Z include (ZXF05U01) in Exit Function Module by double clicking the Z include)
*Find BAdI Definition for VL01N transaction
Find BAdI for VL01N, VL02N, VL03N (Outbound Delivery)
SE24 –> Class Builder, Display CL_EXITHANDLER. Method: GET_INSTANCE put external breakpoint after CALL METHOD cl_exithandler=>get_class_name_by_interface
Call transaction VL01N
In debug window, watch for variable name: exit_name –> BAdI Name
*BAdI Implementation
SE18 –> Check Badi Interfaces (after BAdI name obtained from SE24 debugging)
SE11 -> Append Structure ZAPPENDSTRU001 to table LIKP
SE80 -> Create Function Group (ZTESTFUGR001) contains: Function Modules, Sub Screen
SE18 -> Implement BAdI (BAdI Definition: LE_SHP_TAB_CUST_HEAD, Implementation: ZBADIIMPLEMENT001)
Call VL01N (in Header detail) to check new custom tab.
*Dialog programming
Example: SAPMTZ40 program type module pool (see in SE80 under “Program”) for SPFLI table in include MTZ40TOP.
Screen 100 & 200 Flow Logic: PBO, PAI & Dialog Modules (MODULE & FIELD statements)
Screen Attributes: Next sceen for screen sequence
Screen 200 –> Layout –> Click on “Dictionary/Program fields Window” icon –> Click on “Get from Program” button
Transaction: TZ40
SE41: Menu Painter (Program SAPMTZ40, GUI Status: TD0100..)
SE51: Screen Painter (Program SAPMTZ40, Screen Number: 100,200,210)
Online Documentation: http://help.sap.com/saphelp_nw04/helpdata/en/9f/db9cdc35c111d1829f0000e829fbfe/content.htm
*Dialog programming notes:
OK_CODE must be defined in element list for main screen (not applicable for subsreens)
Pushbuttons and gui elements triggers PAI modules
Scren can be started using dialog transaction (report + screen number) or from ABAP program with CALL SCREEN statement
*Screen procesing
ABAP Program (ABAP Sequence started)
Call Screen statement (Screen sequence started) or Dialog Transaction called:
Screen Flow Logic executed:
PBO dialog modules executed
ABAP Fields with same name tranported to Screen Fields
Screen displayed
User actions (POH, POV may be executed)
If user actions related to function codes (pushbutton or GUI Elements):
Screen Fields with same name tranported to ABAP Fields
PAI dialog modules executed
Next Screen Flow Logic executed (PBO,PAI, etc. until LEAVE PROGRAM, usually in PAI)
If Next Screen = current screen, loop to PBO
If Last Screen, back to ABAP Program
Back to ABAP Program sequence (when the first screen sequence called)
*Tabstrip control:
Application server paging & SAPGui paging
SAPGUI paging: function type must be type P (sapgui), diff subscreens for each tabs, PAI modules not called when user change tab
App server paging: function type is blank, share subscreen accross tab, PAI modules called when user change tab, ABAP code: OK_CODE must be checked in PAI and activate tab in PBO, slower
Can use wizzard or manually created
Defined with CONTROLS statement in ABAP for reference
ZTESTSCREENPROGRAM001 (SE80), module pool (type M), execute using transaction ZTCSCPR001
*Table control:
Defined with CONTROLS statement in ABAP for reference
“LOOP WITH CONTROL cntrl” at PBO and PAI:
During a loop pass the contents of the screen fields of the current row of table control contrl are transported from (at event PBO) or to (at event PAI) the data objects with the same names of the ABAP program
During PBO processing, the transport is done at the end of, during PAI processing at the beginning of the loop pass
Check the table control element list (in screen) have the same name with internal table fields.
in PBO: If the internal table name is different with table control name, use LOOP AT itab INTO wa WITH CONTROL cntrl
in PAI: only the work area wa or the header row of the internal table is filled with the content of the table control rows at the beginning of each loop pass. The content of the internal table is not automatically changed.
Example: ZDEMO_DYNPRO_TABLE_CONTROL_1
*Radio Button
Must be grouped –> from screen Layout –> select multiple radio buttons –> Edit –> Grouping –> Radio Button Group –> Define
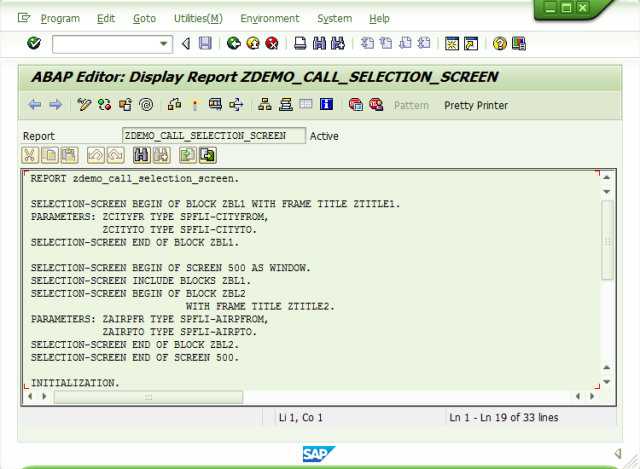
*Selection Screen
Special screens that can be defined in executable programs, function groups and module pools.
Defined in the global declaration section of the ABAP programs with SELECT-OPTIONS, SELECTION-SCREEN and PARAMETERS
Dynpro number 1000 is reserved for a standard selection screen
No dialog modules
Selection screen started from report transaction (as selection screen of ABAP program) or intial screen of dialog transaction
*Selection Screen Processing
ABAP Program (ABAP Sequence started) or Dialog transactions started or CALL SELECTION-SCREEN called
Selection screen immediatelly started
Events:
AT SELECTION-SCREEN OUTPUT (PBO)
User actions (AT SELECTION-SCREEN ON .. event blocks called)
AT SELECTION-SCREEN (for input validation)
If “Execute” GUI Element called: START-OF-SELECTION event –> usually start List Sequence (if list created by list output statements: WRITE, ULINE, etc)
If “Back”, “Exit” or “Cancel”, GUI Element called: AT SELECTION-SCREEN ON EXIT-COMMAND event
If selection screen called by report/transaction transaction: end program
If selection screen called by CALL SELECTION-SCREEN: continue ABAP program sequence
Loop to PBO (same selection screen dynpro called)
*List
List is a screen without screen elements
In every call of a screen sequence, a new list buffer is opened and assigned to this screen sequence. One list buffer can contain up to 21 lists: one basic list and 20 details lists.
*Create List: Use output statements: WRITE, ULINE, FORMAT, SKIP, NEW-LINE, BACK, POSITION, NEW-PAGE, HIDE
(the statements will write on list with index stored in sy-lsind)
The output statements of an ABAP program write to the current list, whose list index is determined by the sy-lsind system field.
The current list after the call of a screen sequence is the Basic List.
*Basic List
Basic List (list with index 0) is started after event END-OF-SELECTION
The basic list is displayed either implicitly during processing of an executable program (see SUBMIT) or explicitly using the LEAVE TO LIST-PROCESSING statement.
In both cases, the list processor is called, which then sends the list to the list screen.
Displaying a list concludes this list in the list buffer. It can no longer be written to, but it can be read or modified.
*Detail Lists
Every user action on a displayed list, which triggers a list event for which an event block is defined in the ABAP program, creates a new details list.
The list index of this details list is always one more than the list index of the list, on which the event was triggered.
This list index on which the even triggered is contained in the sy-listi system field.
The output statements of the event block write to the current details list (in sy-lsind field).
sy-lsind: current detail (or basic) list (where all output statements write to)
sy-listi: current diplayed list
If the event block is finished normally, the details list is displayed automatically in the list screen.
Detail Lists displayed after pushbutton, gui function
AT LINE-SELECTION event block called by ABAP runtime environment after gui function PICK, F2 or double click on line
*List Pages
A list is divided into pages. Every list starts on page 1.
The current page of the current list is stored in the sy-pagno system field.
The output position on the current page in the list buffer is determined by the list cursor, which is provided in the system fields sy-colno (column) and sy-linno (row).
A page can contain up to 60.000 rows. The number of rows per page is stored for the current list in the sy-linct system field. The value 0 represents the maximum number of rows per page.
On every page of a list, you can use rows for a page header and a page footer.
The rows of the page header of the basic list are by default filled with a standard page header from the text elements of the ABAP program
At the list event TO-OF-PAGE, you can fill the page header with additional rows. You can fill the page footer only at the list event END-OF-PAGE.
*List System Fields
System Fields During List Creation
sy-pagno Page number of the current page of the current list. Counting starts at 1.
sy-linno Number of the current row on the current page. Counting starts at 1.
sy-colno Number of the column on which the cursor is positioned on the current list. Counting starts at 1.
sy-linct Number of rows per page of the current list, if it was specified by the LINE-COUNT addition of the statement REPORT or NEW-PAGE. Otherwise, sy-linct has the value zero.
sy-linsz Row width of the current list. Set by the LINE-SIZE addition of the REPORT or NEW-PAGE statement.
sy-title List title. Set in the text elements of a program or with SET TITLEBAR.
sy-srows Current number of rows in the display window. Counting starts at 1.
sy-scols Current number of columns in the display window. Counting starts at 1.
System Fields After List Events
sy-lsind List level of the current list; (basic list: 0, first secondary list: 1, …, 20th secondary list: 20). sy-lsind can be set in the program to replace the current list with the list of the set level.
sy-lilli Absolute number of a selected row in the displayed list. Counting starts at 1.
sy-listi List level of the displayed list.
sy-lisel Content of the selected row.
sy-curow Number of the row in the window, on which the cursor of the displayed list was positioned. Counting starts at 1.
sy-cucol Number of the column in the window, on which the cursor was positioned on the displayed list. Counting starts at 2.
sy-cpage Number of the first displayed page of the displayed list. Counting starts at 1.
sy-staro Number of the first row on the first displayed page of the displayed list. Counting starts at 1, the rows of the page header are included.
sy-staco Number of the first displayed column of the displayed list. Counting starts at 1.
sy-ucomm Function code that triggered the event on the displayed list.
sy-pfkey GUI status of the displayed list.
Program SHOWLISY displays the current values of the above system fields.
*Editing/modifying List in the buffer (already created list / currently displayed list)
READ LINE
MODIFY LINE
GET CURSOR
*List Display Preparation
SET PF-STATUS
SET TITLEBAR
*Displaying List (Starting List Sequence)
Automatically (after END-OF-SELECTION) provided the list has been created by list output statements
LEAVE TO LIST-PROCESSING (in PBO or PAI of a screen for example)
*List Events / List Processing
TOP-OF-PAGE (to setup header)
END-OF-PAGE (to setup footer)
User actions (AT USER-COMMAND or AT LINE-SELECTION event blocks then called)
If next detail list was created by output statements:WRITE, ULINE, etc in list event blocks:
Next detail list displayed (sy-lsind and other list system fields updated) after AT USER-COMMAND or AT LINE-SELECTION event block terminated
If LEAVE SCREEN PROCESSING statement:
Exit list processing/list sequence
If function code BACK in Basic List (list with index 0)
Exit list processing/list sequence
*Logical Database Processing
LOAD-OF-PROGRAM event block
PARAMETERS and SELECT-OPTIONS are passed
INITIALIZATION
Selection screens flow logic (including AT SELECTION-SCREEN OUTPUT), including Selection Screen from Logical Database
START-OF-SELECTION
GET / GET LATE events (when data transported from Logical Database to ABAP program global field)
END-OF-SELECTION
Enter List Processing / List Sequence (if list was created by output statements: WRITE, ULINE, etc)
If Selection screen displayed, call the program again, with previous input parameter between INITIALIZATION and AT SELECTION-SCREEN OUTPUT
(example DEMO_GET or ZDEMO_GET)
*Data Processing/Formatting (of logical database) can use the following methods:
EXTRACT (example: ZDEMO_DATA_PROCESS_EXTRACT) –> data collected to Extract dataset in GET events, formatted in END-OF-SELECTION
INTERNAL TABLE (example: ZDEMO_DATA_PROCESS_INTTABLES_1 & 2) –> data collected to internal table in GET events, formatted in END-OF-SELECTION
READ (example: ZDEMO_DATA_PROCESS_READ) –> processing/formatting when data is read (START-OF-SELECTION)
*Create BAPI
SE11: Create Structure for Import, Export & Table parameter for BAPI FM (ZBAPISTRU001, ZBAPISTRU002)
SE37: Create BAPI FM: type RFC enabled: Z_TEST_BAPI_GET_ORDER_STATUS
SE80: Create Function Group for BAPI FM: ZTESTFUGRBAPI001
SWO1: Create Object (ZTESTOBJ01) and assign BAPI FM to its method (as API function, not FM), release object & method.
*Table Maintenance Generator
SE11: Utilities–>Table Maintenance Generator (ZTESTTABLE001)
*Note: Do not create table maintenance generator if SE16 need to be ble to insert,modify,delete entries
*Note: if there is any changes: Generated Object –> Change
SE93: Create transaction (ZTCTABLE001) –> Transaction with parameters –> Transaction SM30, skip initial screen checked, parameter VIEWNAME=<tablename>, UPDATE=X
SE54: Generate Table Maintenance Dialog, View Cluster Maintenance and Auth Group
SM30/SM31: Maintain Table Views
SM34: View Cluster Maintenance
ZTESTTABLE001: With Maintenance Generator
ZTESTTABLE002: Without Maintenance Generator, mintainable using SE16
ZTESTTABLE003: Foreign Key to ZTESTTABLE002
*Edit table entries
1.goto SE11/SE16.
2.display the records
3.double click the required records
4.goto debug mode
5.you can see some code like this: if code = ‘SHOW’.
6.double click the code
7.change the value to ‘EDIT’.
8.then press F8
9.it will work if the field is not key
*Logical Database
SE36: SLDB: Create Logical Database (ZTESTLDB01)
Logical database could have standard Selection Screen
ABAP Program could link to a Logical Database, so ABAP Program –> Selection Screen
*SAP Query:
Step1: SQ02 – Create Infoset (specify query area client dep / client indep), can alter selection screen from logical database (ZINFOSET004, remove PA_CANC)
Step2: SQ03 – Assign Infoset to user group
Step3: SQ01 – Create Query from authorized Infoset
SQVI: Create QuickVew (Query for specific user)
SAP QuickView can be converted to SAP Query.
*ALV
Use SLIS type-pools.
Field catalog:slis_t_fieldcat_alv
List Header:slis_t_listheader
Title Bar:lvc_title
Events:slis_t_event
Function Modules:
Get Events: REUSE_ALV_EVENTS_GET
Display ALV:REUSE_ALV_GRID_DISPLAY
Modify event name to call “USER_COMMAND” form
Create Form “USER_COMMAND”
Test Program:ZTESTALV01
*DATASET
Download to app server
OPEN DATASET gv_file FOR OUTPUT IN TEXT MODE ENCODING DEFAULT.
CONCATENATE work area fields to string, SEPARATED BY “,”
TRANSFER string TO gv_file
CLOSE DATASET.
Upload from app server
OPEN DATASET gv_file FOR INPUT IN TEXT MODE ENCODING DEFAULT.
Loop
READ DATASET gv_file INTO string.
SPLIT string AT “,” INTO work area fields
APPEND work area to internal table
CLOSE DATASET
Download/Upload to SAPGUI
CALL FUNCTION ‘GUI_DOWNLOAD’ / ‘GUI_UPLOAD” with internal table as parameter
*Enhancement
Enhancement Options and sections are “hooks” to which you can assign an enhancement. That is, you can enhance an option by an enhancement.
Enhancement Options: implicit/explicit
Implicit Enhancement Options can be displayed in the ABAP Editor by following the path: Edit – Enhancement Operations – Show Implicit Enhancement Options
Explicit Enhancement Options In ABAP programs, you can select either a “position” or a program “section” as an explicit enhancement option
To mark a position in an ABAP program as an explicit enhancement option, use the following ABAP statement:
ENHANCEMENT-POINT enh_id SPOTS spot1 spot2 …
To mark a section in an ABAP program as an explicit enhancement option, use the following ABAP statement:
ENHANCEMENT-SECTION enh_id SPOTS spot1 spot2 …
…
END-ENHANCEMENT-SECTION.
Using enh_id, you define the name of the Enhancement Option or the source code enhancement.
After SPOTS, the enhancement option must be assigned to at least one (simple) Enhancement Spot.
An Enhancement Spot for source code enhancements can either be entered directly or generated by selecting Enhancements – Create Enhancement.
ENHANCEMENT-POINT – can either be static (for example, additional data declaration) or dynamic (for example, additional coding).
ENHANCEMENT-SECTION – can either be static (for example, replace an existing data declaration) or dynamic (for example, replace coding).
Create an enhancement implementation:
For an explicit enhancement option, select the Enhancement Spot in the Object Navigator, and choose Implement in the context menu.
For an implicit enhancement option, call the Enhancement Builder in the relevant tool (ABAP Editor, Function Builder, Class Builder) for executing an enhancement (directly in the program).
1 Enhancement Spot can be used in multiple Enhancement Option(s)
1 Enhancement Spot can be implemented in multiple Enhancement Implementation(s)
1 Enhancement Implementation can have multiple Enhancement Implementation Element(s)
Enhancement Implementations within one Enhancement Option is executed in sequence order from smallest to largest Implementation id, skipping replaced implementation(s)
To create explicit enhancement of ABAP program:
- Go to SE38/SE80 to open ABAP program, choose Edit – Enhancement Operation – Create
- Enter Enhancement Option: Point / Section name.
- Create / Choose existing Enhancement Spot (do not tick on internal use checkbox)
- Click on Enhance icon, like @ (Shift+F4)
- Click on ENHANCEMENT-POINT or ENHANCEMENT-SECTION
- Choose Edit – Enhancement Operation – Create
- Create / Choose existing Enhancement Implementation of selected Enhancement Spot
- Write the code
- CLick on Activate Enhancements icon
Example: ZTESTENHANCEMENT01 Program, using ZTESTENHSPOT02.
*Modification Assitant
Only works if original system of the program is different, check with Object Directory Entry
To change original system, go to SE03
SE95: Modification Browser
*Important Facts:
List is a screen, like selection screen and dialog screen
ABAP is modular programming
START-OF-SELECTION is main procedure
Event di trigger oleh aBAP runtime environment
MODULE module AT EXIT-COMMAND in screen PAI only executed if fcode type of gui component pressed is E
*List Context Menu
Create PF-Status with Function Key Atrributes: List With Context Menu set
Set Function Coded: %CTX for Shift+F10 (make sure it’s enabled)
FORM on_ctmenu_request USING l_menu TYPE REF TO cl_ctmenu.
DATA lin TYPE i.
GET CURSOR LINE lin.
IF lin > 2 AND sy-lsind = 0.
CALL METHOD l_menu->add_function
EXPORTING fcode = ‘DETAIL’
text = text-001.
ENDIF.
CALL METHOD l_menu->add_function
EXPORTING fcode = ‘BACK’
text = text-002.
ENDFORM.
*ABAP objects
ZDEMO_ABAP_OBJECTS_CONTROLS
*ABAP EVENTS / INTERFACES:
EVENTS are like function pointer in C
Can be asssigned to a function/method by SET HANDLER statement (SET HANDLER handler_function)
The function/method handler must be defined with FOR EVENT statement.
INTERFACE contains the declaration of interface components, but does not contain method implementations.
Interface can be implemented in classes using INTERFACES, which enhances the external interface of the class by adding the interface components.
Example:ZDEMO_ABAP_OBJECTS_EVENTS
*Import/Export
Export to memory:
EXPORT ZTEXT1 ZTEXT2 = ‘ZLiteral’ TO MEMORY ID ‘ZText-ID’.
or
EXPORT ZSBOOK_ITAB TO MEMORY ID ‘ZTable-ID’.
Import from memory:
IMPORT ZTEXT2 TO ZTEsT FROM MEMORY ID ‘ZText-ID’.
or
IMPORT ZSBOOK_ITAB TO ZSBOOK_RECEIVER FROM MEMORY ID ‘ZTable-ID’.
Export to DATABASE (cluster):
ZINDX_WA TYPE INDX.
ZINDX_WA-AEDAT = SY-DATUM.
ZINDX_WA-USERA = SY-UNAME.
ZINDX_WA-PGMID = SY-REPID.
EXPORT ZTEST_ITAB TO DATABASE INDX(HK) ID ‘ZTable-ID’ FROM ZINDX_WA.
Import to DATABASE (cluster):
IMPORT ZTEST_ITAB TO ZTEST_ITAB FROM DATABASE INDX(HK) TO ZINDX_WA ID ‘ZTable-ID’.
Import Directory:
ZINDX_WA TYPE INDX
ZCDIR_ITAB TYPE TABLE OF CDIR.
IMPORT DIRECTORY INTO ZCDIR_ITAB FROM DATABASE INDX(HK) TO ZINDX_WA ID ‘ZTable-ID’.
Example: DEMO_DATA_EXT_CLUSTER*
*Context
SE33: Create Context
In ABAP use: CONTEXT <context_name>
–> TYPE automatically generated: context_t_<contextname>
–> DATA automatically generated: context_<context name>
Example: ZDEMO_CONTEXT_DEMAND
*Extract
Extract works like internal table
Fields constructed with filed groups
Field Groups constructed with “INSERT field TO field_group” statement
Content of Extract dataset filled with EXTRACT statement, which links the current content of the field to Extract dataset
Used in GET if using Logical database
“header” is a predefined name of a special field group whose components are automatically a part and a key of all other field groups.
The LOOP and ENDLOOP statements define a a loop around a statement block. The loop is passed for each row from the Extract dataset, until it is ended with one of the statements from the section Loops.
During each loop pass, the LOOP statement assigns the contents of the components from the current row of the extract dataset to the data objects that make up the field group of the row.
If the extract dataset is not sorted, the sequence in which the rows are read is the same in which they were appended with the EXTRACT statement.
If the extract dataset is sorted with SORT, the read sequence is the same as the sort sequence.
The statement block of a LOOP can contain control structures for control level processing. The corresponding control statement is AT.
A prerequisite for control level processing is that the extraction dataset is sorted.
Example: ZDEMO_DATA_PROCESS_EXTRACT
*REF TO
TYPE REF TO is like pointer in C (in ABAP is called reference variable)
ZDREF1 TYPE REF TO DATA
DATA is predefined
CREATE DATA ZDREF1 TYPE ZT_STRUCT –> creates an data object and assigns the reference to the data object to ZDREF1 reference variables
Deferencing operator: ->*
ASSIGN ZDREF1->* TO <ZFS1>. –> Assign memory area referenced by ZDREF1 to field symbol <ZFS1>
Example: ZDEMO_DATA_REFERENCE
*SET/GET BIT
field TYPE X is hexadecimal
SET BIT posistion OF field TO 0 or 1
Example: ZDEMO_DATA_SET_GET_BIT
*Dialog Modules
SE35: Create Dialog Modules
Like a Transaction, has a Program + Initial Screen
SE80: Create Program & Screen of dialog module
Difference with a Transaction is that Dialog Module has interface
Called by CALL_DIALOG_MODULE in ABAP Program
Example: ZDEMO_DIALOG_MODULE (Program=ZSAPMDEMO_TRANSACTION screen=100 interface: import params: ZPI_SPFLI-CARRID, ZPI_SPFLI-CONNID export params: ZPI_SPFLI_WA
ZDEMO_DIALOG_MODULE is called by ZDEMO_DIALOG_MODULE program with below statement:
CALL DIALOG ‘DEMO_DIALOG_MODULE’
EXPORTING
ZPI_SPFLI-CARRID FROM ZSPFLI_WA-CARRID
ZPI_SPFLI-CONNID FROM ZSPFLI_WA-CONNID
IMPORTING
ZPE_SPFLI_WA TO ZSPFLI_WA.
*ABAP WebDynpro
Create using SE80: type: Web Dynpro Component / interface: ZWEBDYNPRO_001_HELLOW
–Specify Type: Web Dynpro Component
–Specify Window Name: ZWEDBYNPRO_001WINDOW
–Specify View Name: ZWEDBYNPRO_001VIEW
–Click on view ZWEDBYNPRO_001VIEW, righ-click on ROOTUIELEMENTCONTAINER, insert element
–Specify Element: ZELEMENT01, with type: Caption
–Specify Text attributes of ZELEMENT01: “Hello World”
–Create Web Dynpro Application (right click on Web Dynpro component –> Create –> Web Dynpro Application)
–Activate everything
–Right click on Web Dynpro application –> Test
http://rolnetbook.rumahbsd.com:8000/sap/bc/webdynpro/sap/zwedbynpro_001_hellow (open with Opera, with IE 11 error compatibility)
*ITSmobile
TSmobile is a SAP technology to connect mobile devices to a SAP system in order to run applications based on the widely used Dynpro programming model. In simple terms, it used to run a dynpro-based application on a browser-based mobile device such as a handheld mobile device or forklift.
ITSmobile replaces the Web SAPConsole which will be phased out with SAP NW 7.10.
**ITS templates:
ITSMobile features HTML generation of SAP Screens through its Template Generator. The generated HTML acts as a ‘Template’ for further customization as per the flexible user requirements.
**Scenarios when ITS templates need to be generated:
- In case, you have custom business requirement, you need to create custom programs for it. This is done by creating a module pool program with the required logic considering all the constraints of designing your screens (given below).
- A lot of standard transactions like LM00, LM01, LM02, LM27, LM71, etcetera are available for which ITS templates need to be generated, if not already present.
**Custom Development Screen Guidelines for ITS Applications:
- Keep the UI simple by design.
- Limit the height and width of the screens such as that the mobile device can handle. It is usually around 20 characters by 16 rows.
- It is recommended to limit the UI elements to: “Text Box”, “I/O Fields”, “Checkboxes”, “Radio Buttons” and “Pushbuttons”. Frames, Tab strips, Table Controls are not supported.
- Do not include any Buttons in GUI Status. Instead, include them on the Screens.
Error/Warning/Status/Information messages should be handled on an output field such as a ‘Textbox’ for displaying only messages. That means, “Message” statement or calling a Function Module to show a popup message / confirmation prompt, should not be used.
**Overview of steps involved in creating ITS templates from scratch:
- Create an Internet Service
- Create an ICF service for the above Internet Service
- Generate ITS templates for each screen.
**Steps for creating Internet Service for custom transaction:
***Create an Internet Service:
- In SE80, choose “Internet Service” from the dropdown and give an internet service name (ZITSMOBILE)
- Give an internet service name (ZITSMOBILE) & the name of the transaction to be called when running the ITS application (ZITSMOB). Save it. ZITSMOB is a is a dialogue transaction for a module pool program.
- Give a short text for the internet service.
- For parameter ‘~Transaction’, give the transaction name of the program (ZITSMOB). Save
- Create template by right clicking on the internet service CREATE->TEMPLATE.
- Give the theme as 99, enter the first screen number for which template needs to be created (1000) and the generating style should be “Mobile Devices (without HTML tables)”. Save.
- HTML template gets generated. Click on ‘Publish template’.
- Right click on the Internet service, select PULISH->COMPLETE SERVICE. You should get a success message.
***Create an ICF Service:
- Go to SICF transaction; execute the report to get into the second screen.
- Navigate to the path default_host/sap/bc/gui/sap/its and right click and select ‘New sub-element’.
- Message will appear, click on check button.
- Give the same Internet service name as given in SE80 (ZITSMOBILE)
- In the “Service Data” tab for “GUI Lik” drop down, select YES. In the “GUI configuration” tab give the following parameters:
~THEME 99
~TRANSACTION ZITSMOB
~ITSMOBILEMSGSOUND 1
~ITSMOBILECSSINCLUDE mobile
~ITSMOBILE 1
- In the “Logon Data” tab choose Procedure as Alternative logon procedure. Delete other types of “Logon Procedures List” retaining only “Fields Authentication”.
- In the “Handler List” tab give the class name as “CL_HTTP_EXT_ITS”
- In the “Error Pages” tab, choose the last radio button “System Logon”. Click on the “Configuration” button. Click the check boxes: “System ID”, “Client”, “Language”. Change the “Protocol” to “Do Not Switch” & click the checkboxes “Do Not Display Warnings” & “Chek for Multiple Logon”. In “Logon Layout and Procedure”, choose “Custom Implementation” radio button, “ABAP Class”: “CL_MOBILE_SYSTEM_LOGIN”. Click on check button.
- Save the service, right click and activate it.
***Generate ITS templates for each screen.
- In SE80, to generate ITS template for each screen of your program (ZITSMOB) (only if it’s not already generated), right click on the screen number->”Other function”->”Create template”. Usually, the HTML template for the first screen gets generated while creating the Internet Service itself.
- Select the service that was created (ZITSMOBILE), Theme as “99” & select the Generating style as “Mobile devices (Without HTML tables)”.
- An HTML template is generated
- Save & publish the template by clicking on ‘Publish Template’ button.
- Repeat Steps 1-4 for all the screens of the program (ZITSMOB).
http://rolnetbook.rumahbsd.com:8000/sap/bc/gui/sap/its/zitsmobile
**Steps for creating Internet Service for standard transaction:
***Create an Internet Service:
- In SE80, choose “Internet Service” from the dropdown and give an internet service name (ZSU01)
- Give an internet service name (ZSU01) & the name of the standard transaction to be called when running the ITS application (SU01). Save it.
- Give a short text for the internet service.
- For parameter ‘~Transaction’, give the standard transaction name (SU01). Save.
- Add parameter ‘~GENERATEDYNPRO’ with value = 1. This will enable automatic generation of HTML templates for the screens for which they’re not already generated. Also, these screens will have standard SAP look.
~GENERATEDYNPRO 1
~TRANSACTION SU01
- Activate it
***Create an ICF Service:
- Go to SICF transaction; execute the report to get into the second screen.
- Navigate to the path default_host/sap/bc/gui/sap/its and right click and select ‘New sub-element’.
- Message will appear, click on check button.
- Give the same Internet service name as given in SE80 (ZSU01)
- In the “Service Data” tab for “GUI Lik” drop down, select YES. In the “GUI configuration” tab give the following parameters:
~GENERATEDYNPRO 1
~TRANSACTION SU01
- Save the service, right click and activate it.
- Right click and test it.
http://rolnetbook.rumahbsd.com:8000/sap/bc/gui/sap/its/zsu01?sap-client=100
*Illustration SE38 (ABAP Editor) transaction